
Getting Started
Opine is a community-management platform for clubs, interest groups, and membership communities. It runs on the web with deep Telegram integration, and its workflows automate the repetitive work, onboarding, renewals, event follow-ups, so managing memberships, events, and analytics happens from one place instead of a pile of spreadsheets and forms.
Manage communities at a glance
Opine provides a suite of tools to run your community effectively. Instead of spreadsheets and scattered forms, you visualise member activity and health in one place, and hand the repetitive parts to workflows.
Capturing user sentiment
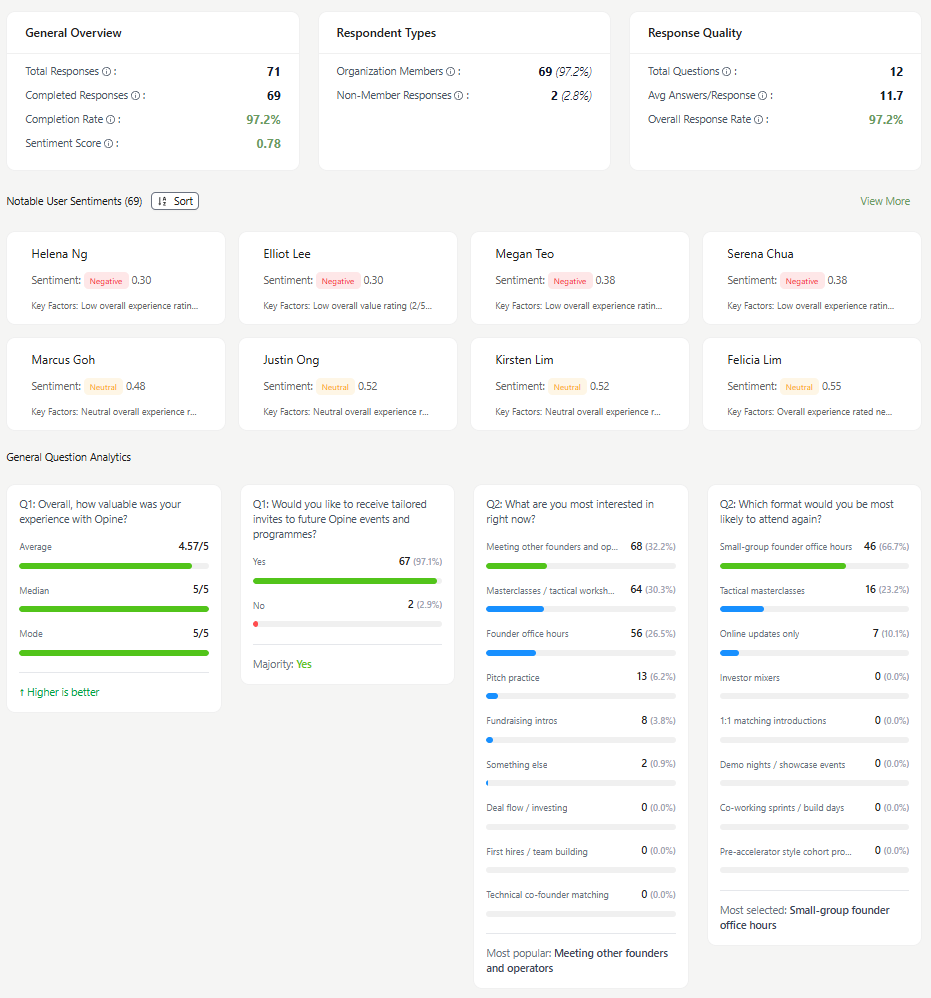
Sentiment is captured across every touchpoint, events, feedback forms, and polls. Opine uses an AI workflow to turn each response into a sentiment score between 0 and 1:
- 0: Unsatisfied
- 0.5: Neutral
- 1: Happy
Drag the edge of the sidebar to resize it, or collapse it to icons only when you want the full width for a table.
The Analytics Hub
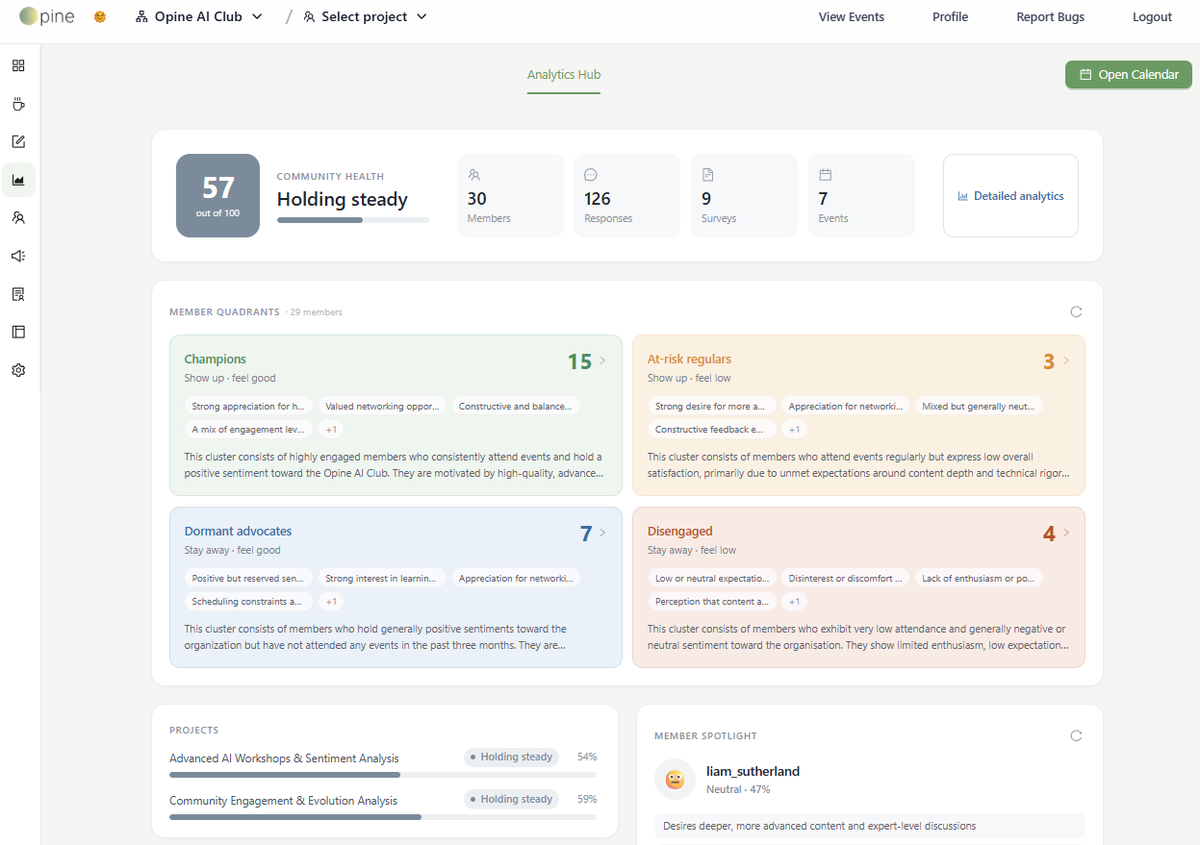
The Analytics Hub is your command centre, an immediate overview of your entire organisation or workspace in a single click.
- Community Health: a single score out of 100 with member, response, survey, and event counts, and a link through to detailed sentiment analytics.
- Member Quadrants: your members grouped four ways (Champions, Dormant Advocates, At-Risk Regulars, Disengaged), each with the themes driving that group and a plain-language explanation of who's in it. Click any name to jump straight to that person's member detail page.
- Workspaces: a health bar per workspace, so you can see which stream of work is carrying the community and which is drifting.
- Member Spotlight: an individual worth your attention right now, with the sentiment behind it.
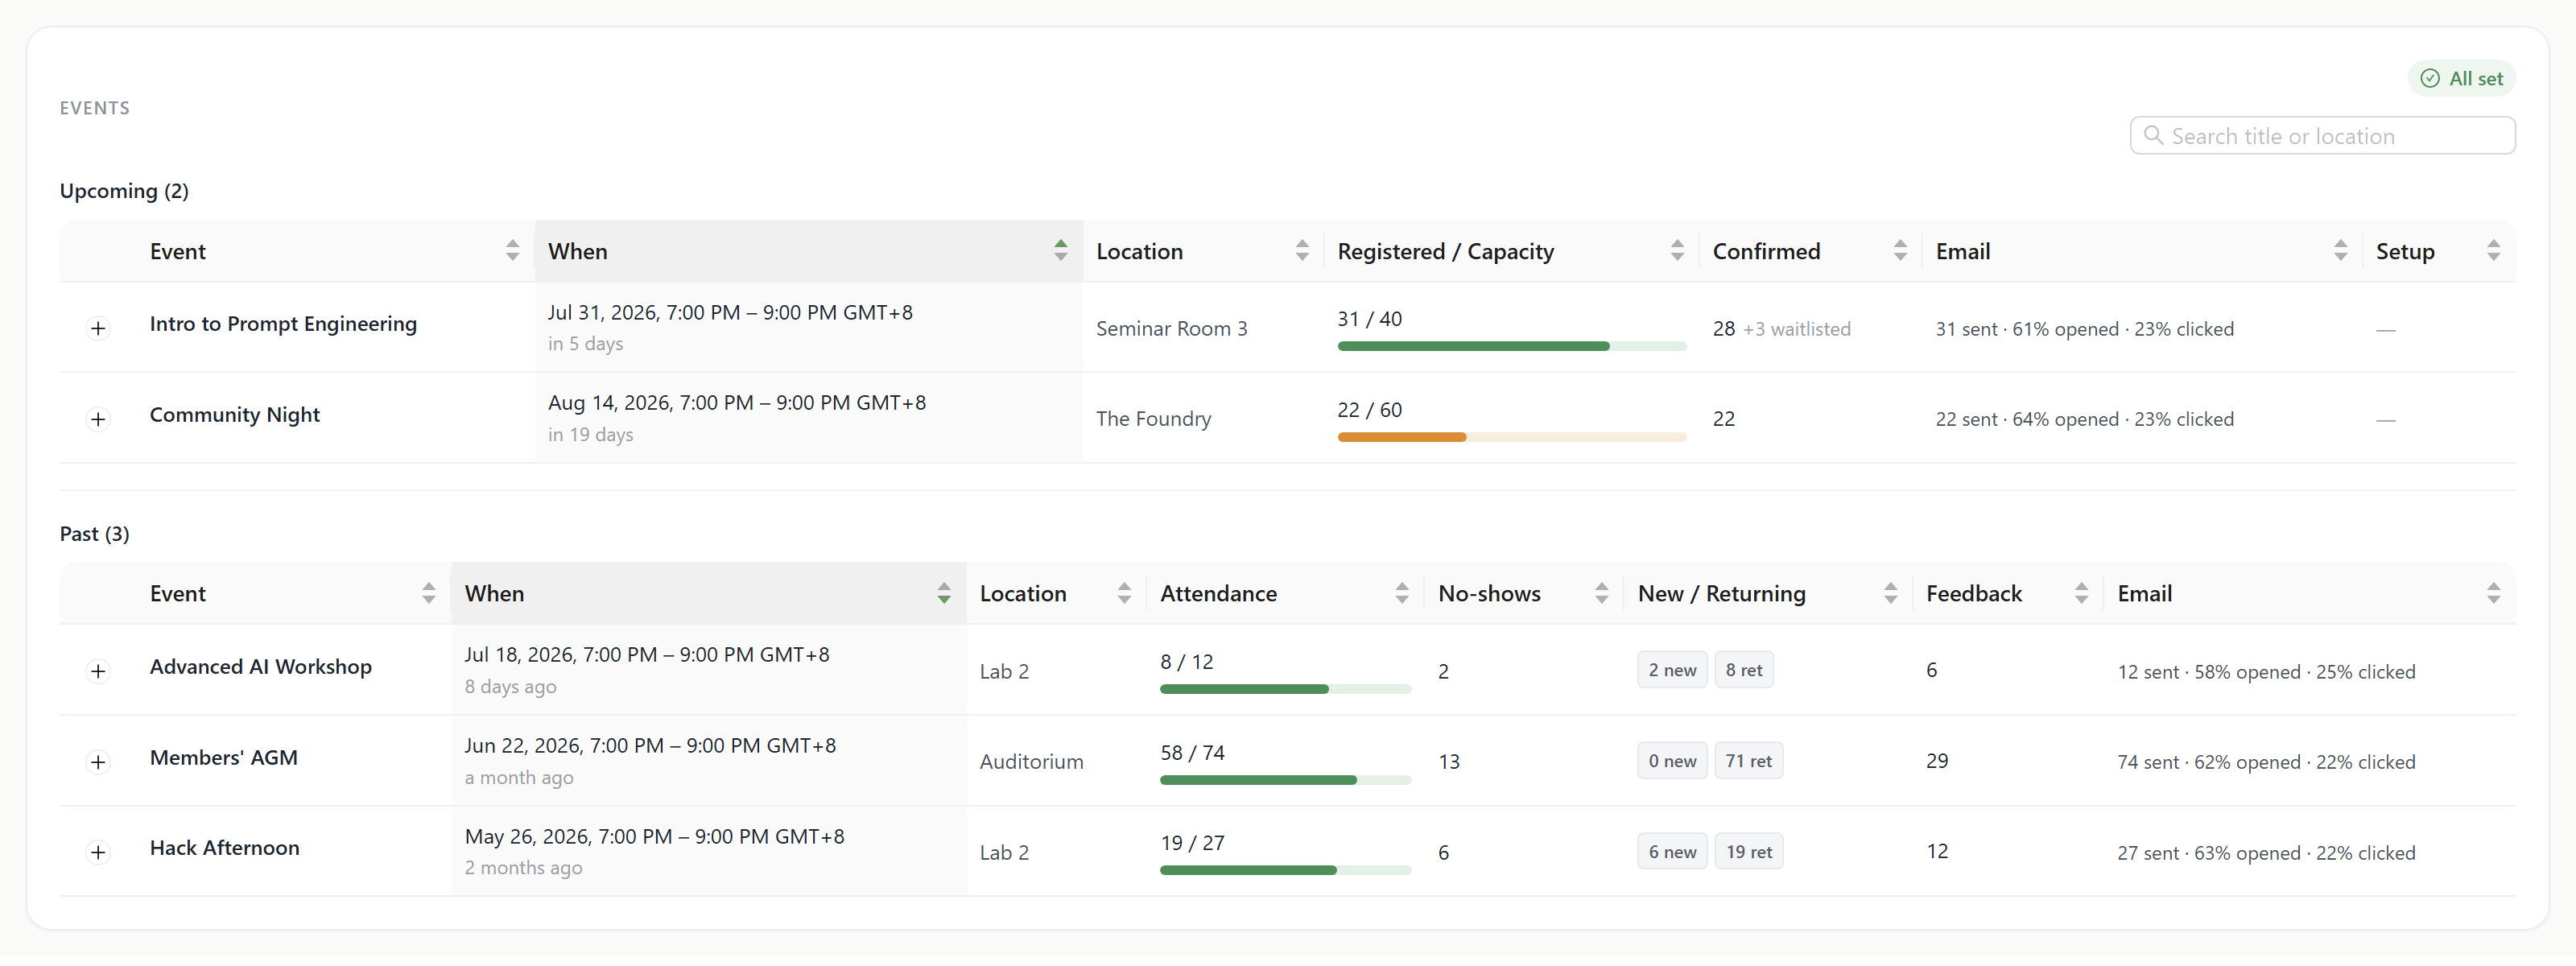
- Events: one panel covering upcoming and past events. Upcoming are ordered by what's happening soonest, past by what ran most recently, and every column is sortable. Expand an event for its RSVP, attendance, and feedback breakdown.
The quadrants and the At-Risk Members card are entry points, not just readouts: from either you can filter the member table down to a single engagement group and act on that list.
Understanding performance metrics
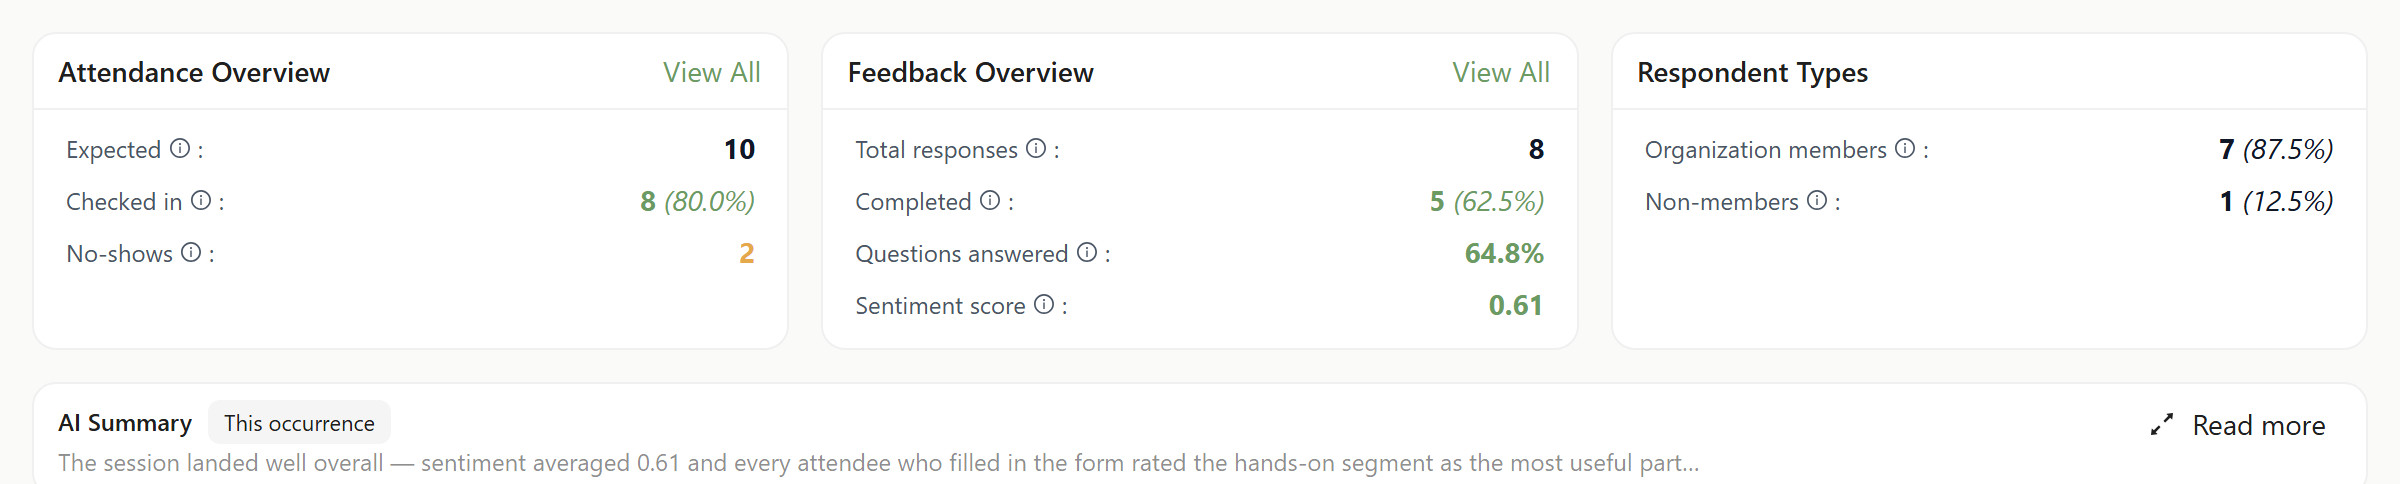
Every event, feedback form, and poll captures its own performance metrics. The Summary tab opens with a compact row of cards:
- Overview: total responses, how many were completed (with the rate), the share of questions that got an answer, and the aggregate sentiment score.
- Respondent Types: the split between organisation members and non-members.
- Attendance (events only), expected attendance, who checked in, and no-shows.
- AI Summary: a few sentences on whether it went well, why, and the one thing worth improving. Click it for the full text.
Below the cards sit the notable user sentiments, then a per-question breakdown with trend analysis across event instances.
Moving beyond guesswork
Opine turns qualitative interactions and survey responses into quantifiable, actionable data, so you can shift from reactive troubleshooting to proactive care, and spot falling sentiment early enough to intervene before members disengage.
Account & Telegram
Create your Opine account, then link Telegram to unlock bot features and the in-Telegram web view.
Creating an account
Head to app.opine.asia to open the web app. You can sign up two ways:
- Google: sign in with your Google account for instant access.
- Email: register with an email address, then click the confirmation link we send to verify your account.
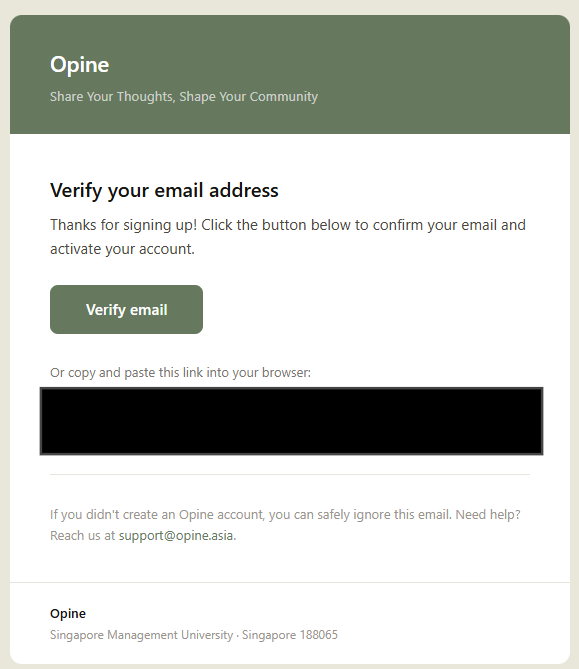
Forgot your password? Reset it from the login page, you'll get an email confirmation. You can also change your email address later from the Profile tab (the new address must be confirmed via email).
Linking your account with Telegram
Linking Telegram lets you use bot-based features and open the Opine web UI directly inside Telegram. After creating your account, a banner appears at the top of the web app with a Link Telegram button; click it and confirm the connection in Telegram.
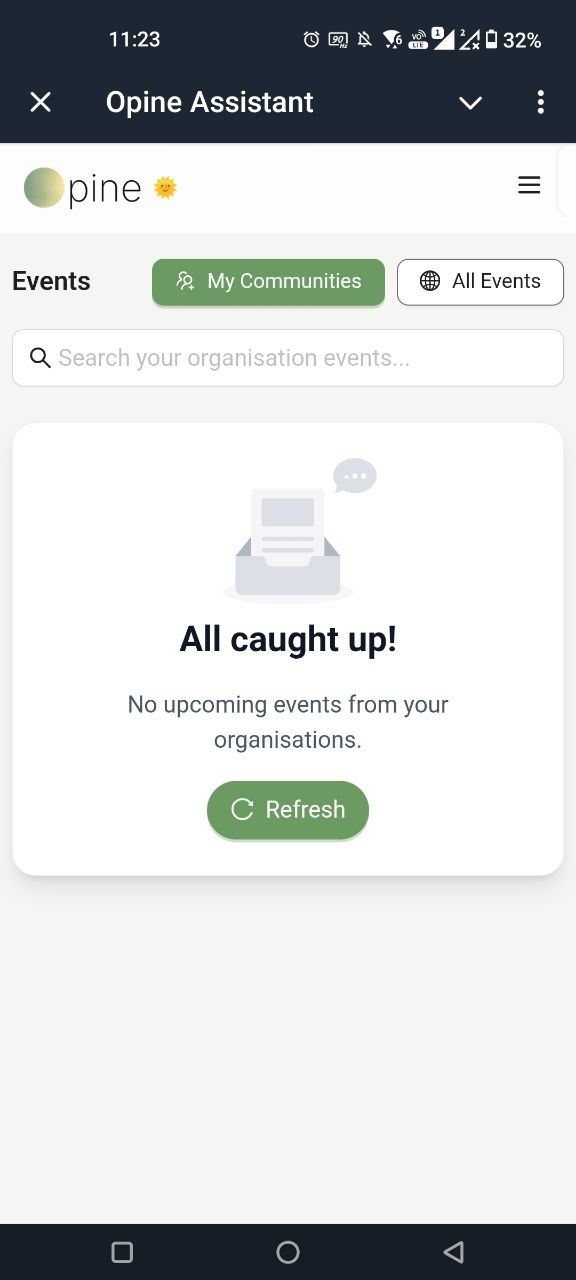
Bot commands
- /home: open the Opine web interface in Telegram to view events and your profile.
- /inbox: read messages sent to you by organisations.
The bot for app.opine.asia is @opine_assistant_bot. If you're on a custom deployment the bot handle may differ.
Organisations & Workspaces
An Organisation is your club or community. Inside it, Workspaces organise specific streams of work, events, and surveys. Every new organisation starts with a default workspace so you can create right away.
Creating an organisation
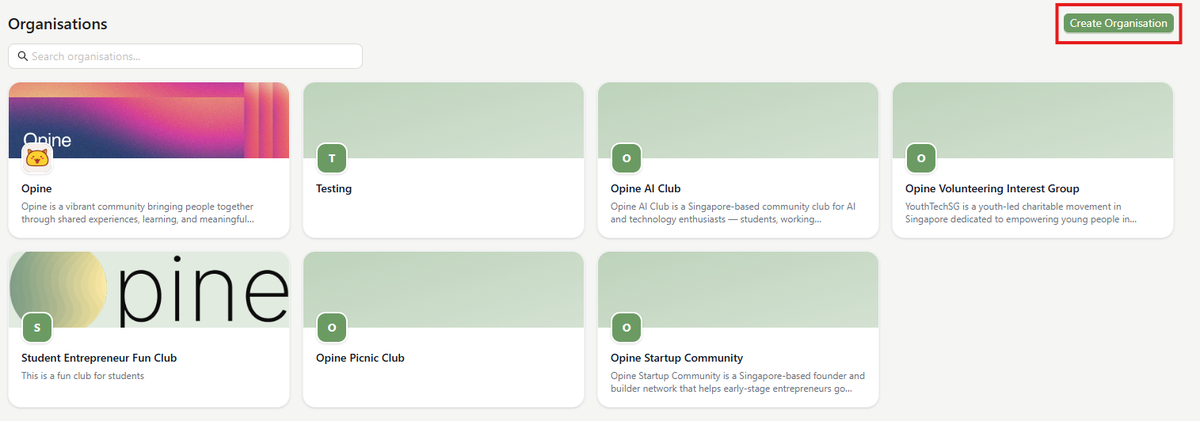
Open the org selector on the home screen and switch to the Organisation view. Click Create Organisation, enter a name, and confirm to initialise your workspace.
Working with workspaces
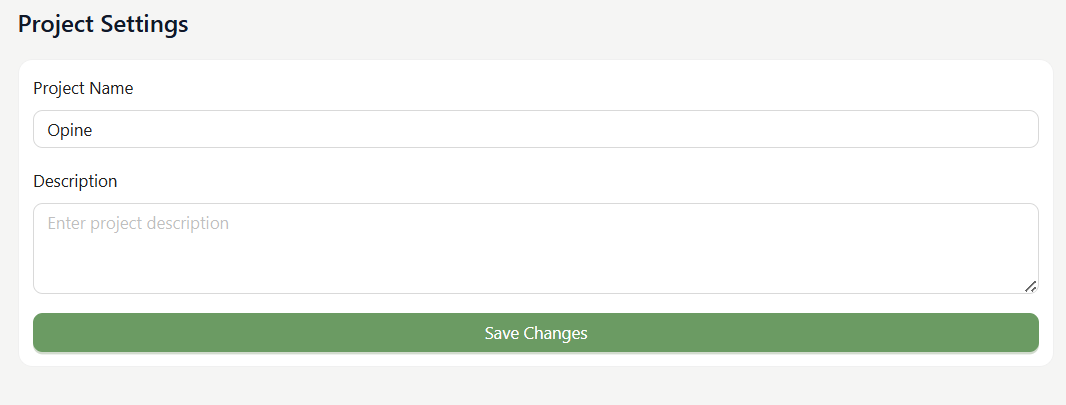
Workspaces (previously called Projects) sit under an organisation and group related events and surveys. A new organisation starts with a First Workspace so you can create straight away. Use the workspace selector in the header to switch scope; a Viewing badge shows whether the numbers on screen cover one workspace or the whole organisation.
Select a workspace and open its Workspace Settings tab to rename it, edit its description, or delete it.
Tracking workspace sentiment
Just like the organisation view, you can drill into the sub-sentiments for a single workspace via the Action Hub, click View Detailed Sentiments.
Your organisation landing page
Every organisation gets a public landing page you can share with members or guests. Edit it in the Landing Page Editor: set social links, toggle whether the page is public, and enable a Join Community button or a Paid Membership button. The editor is an extension: switch it on under Community Extensions and its sidebar tab appears.
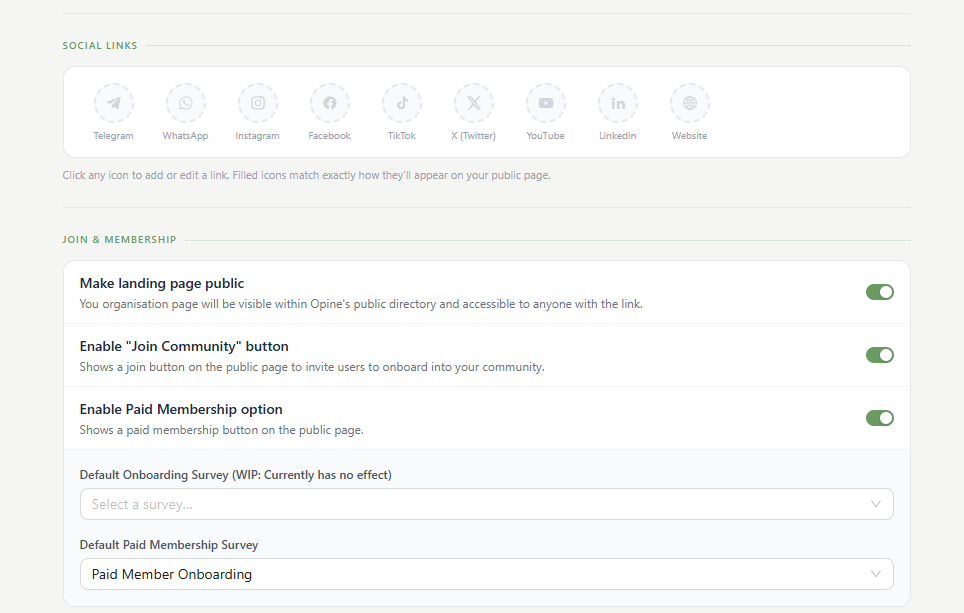
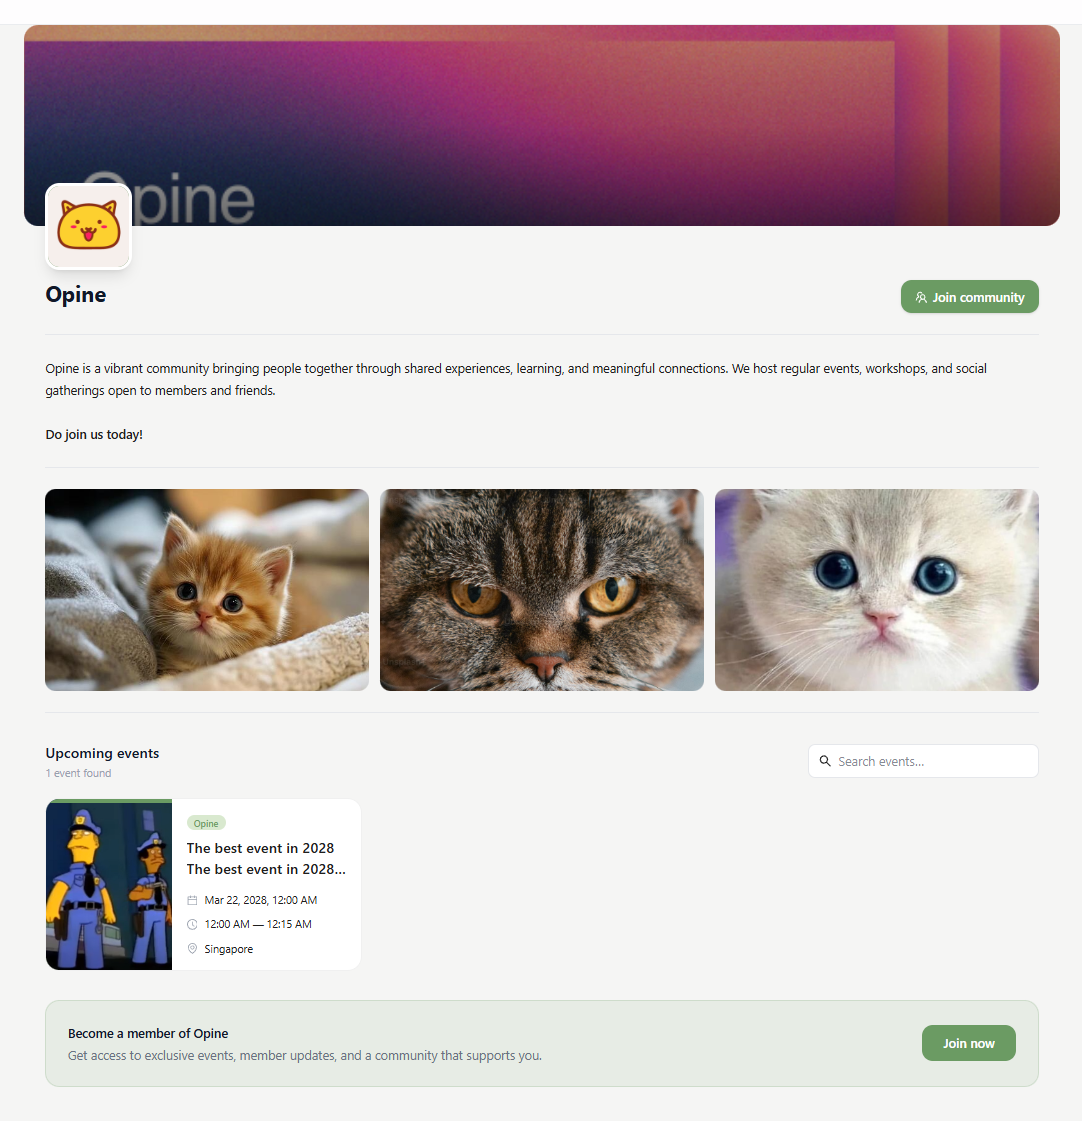
When paid onboarding is enabled, an extra button appears on the landing page. Clicking it adds the user as a general member, then routes them through the paid onboarding form. Confirmation steps (e.g. a Telegram group invite) may still be handled manually afterwards.
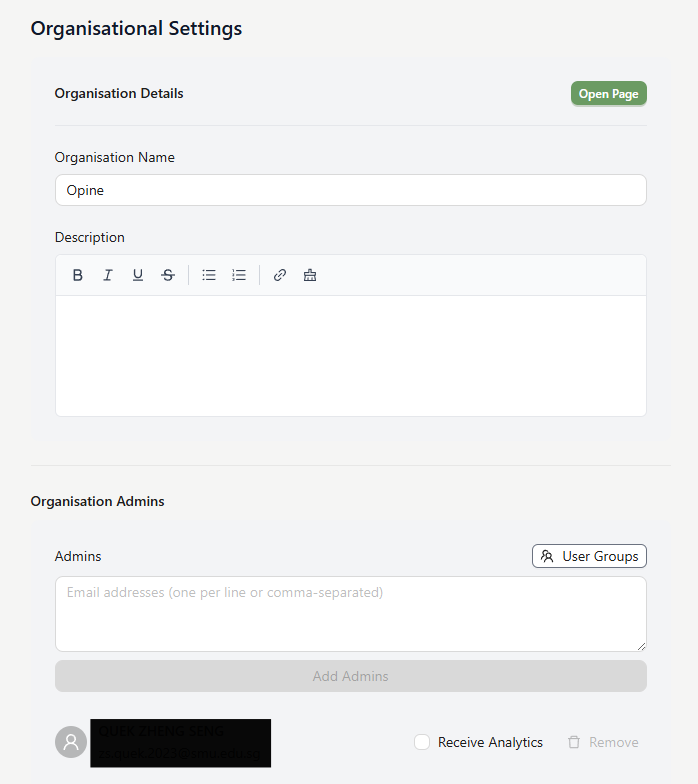
Organisation settings
The Organisation Settings tab is the control panel for your community, split into tabs so each area stays manageable. The admins and workspaces tabs both have a search box, which matters once you're past a handful of either. From here you can:
- Add admins and create admin groups for survey management.
- Enable an event-approval process for chapters.
- Enable auto onboarding: anyone who attempts a form is invited to join as a member, and a Join button appears on the landing page.
- Enable paid onboarding and attach a paid onboarding form.
- Manage Telegram connections (see the Telegram Connections chapter).
Showing and hiding features
Not every community needs every tool, so the optional ones live in their own tab: Community Extensions. Each is a card you can open before deciding: what it does, what it adds to your sidebar, and any settings of its own. The on/off switch is on the card and on its page.
- Chapters: sub-communities nested under this one, each running itself.
- Telegram Connections: link your Telegram groups to recruit and broadcast from them.
- Landing Page Editor: a public page for your community.
- External Imports: bring in events and responses hosted on Luma, Google Forms or Microsoft Forms.
- PDPA Consent: a data-protection consent question on the forms you create (see Surveys → PDPA consent on your forms).
If a chapter of this guide describes a tab you can't find, this is almost always why, turn the extension on in Community Extensions and the tab appears. Turning one off hides the tab but keeps its data, so you can switch it back on later without losing anything.
Some extensions need a paid plan; those show the plan they need instead of a switch. The page still opens, so you can read what it does before deciding whether it's worth upgrading for.
Always click Save to apply changes. Deleting an organisation is permanent; its data cannot be recovered.
People & Permissions
Control who can see and do what. Opine has three roles, and admin groups let you grant survey access in bulk.
Admins and roles
Add admins under Organisation Settings. If they already have an Opine account they're added directly; otherwise they receive an email invitation. There are three roles:
- Owner: full visibility across all workspaces and surveys; cannot be removed.
- Admin: visibility across all workspaces and surveys; can add or remove other admins.
- Member: a workspace-scoped role that only sees and creates within its allocated workspaces, plus any surveys shared through an admin group.
Allocate a Member to specific workspaces from the admin list's workspace allocator. Parent-organisation roles inherited by chapters are clamped to Owner/Admin.
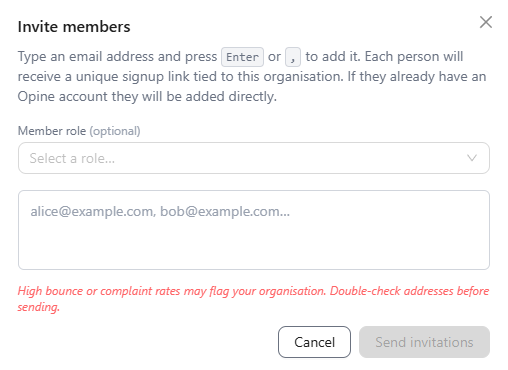
High bounce or complaint rates on invitations may flag your organisation, double-check addresses before sending. Track invitation status under the Invitations tab.
Admin groups
To streamline permissions, create Admin Groups and attach a whole group to a survey or workspace at once.
- Open Organisation Settings or Survey Settings.
- Click the User Groups button.
- Edit an existing group or create a new one.
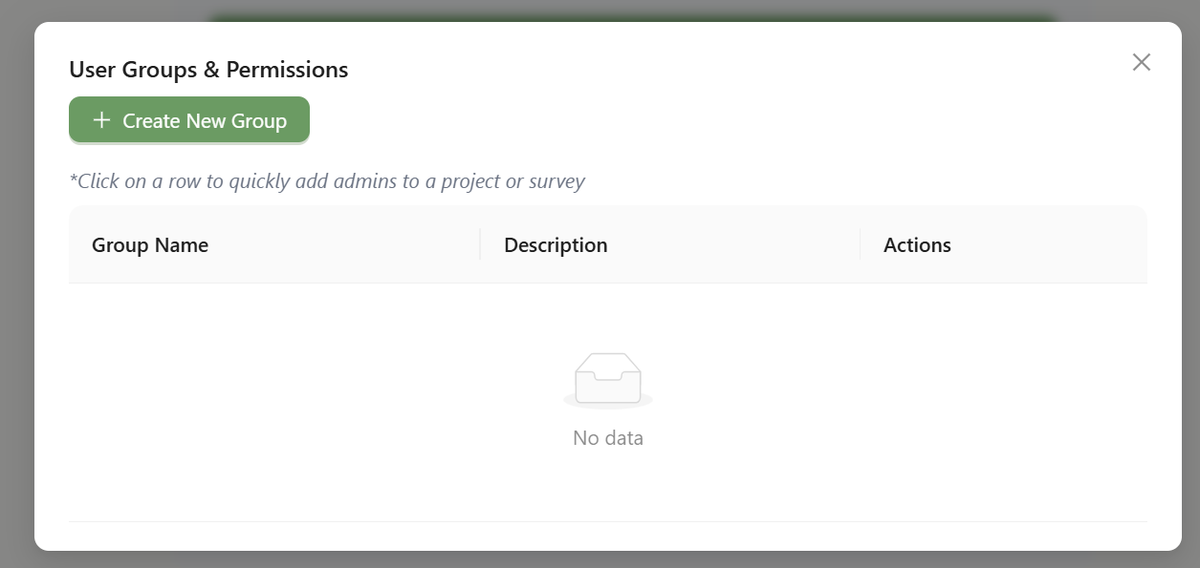
Removing an admin from a group revokes their access to every survey that group is attached to.
Receiving analytics as an admin
Admins can opt in to receive analytics once a survey's analysis completes. Notifications arrive via the Opine Inbox, or by email if the account isn't connected to Telegram. Organisation-level analytics for admins are broader than survey analytics: they include organisation and workspace sentiment, with an option to drill into a specific survey.
Telegram Connections
Link Telegram groups to your organisation to tag members, invite sign-ups, and broadcast, all from within your group chats. Telegram Connections is an extension: enable it under Community Extensions and the tab appears in the sidebar.
Linking a Telegram group
Add the Opine bot (@opine_assistant_bot) to your Telegram group. Then, in Opine's Telegram Connections tab, copy the provided command and paste it into the group chat. The bot replies with a success message once linked.
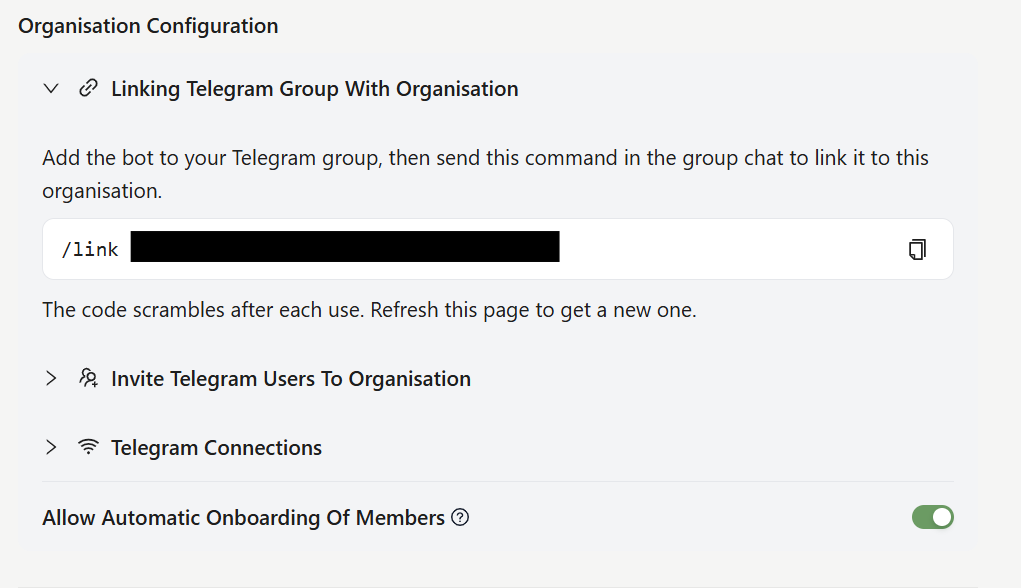
Only admins who have linked their own Telegram account are recognised by the bot. Each Telegram group links to exactly one organisation, but an organisation can link many groups.
Inviting users from Telegram
From a linked group you can invite users to create an Opine account or join with a specific role, using the commands listed in Telegram Connections:
- Create account: posts a button that sends users to the bot to create their Opine account.
- Invite as member: posts a role-tagged button; tapping it adds the user to your organisation with that role and sends a confirmation via the bot.
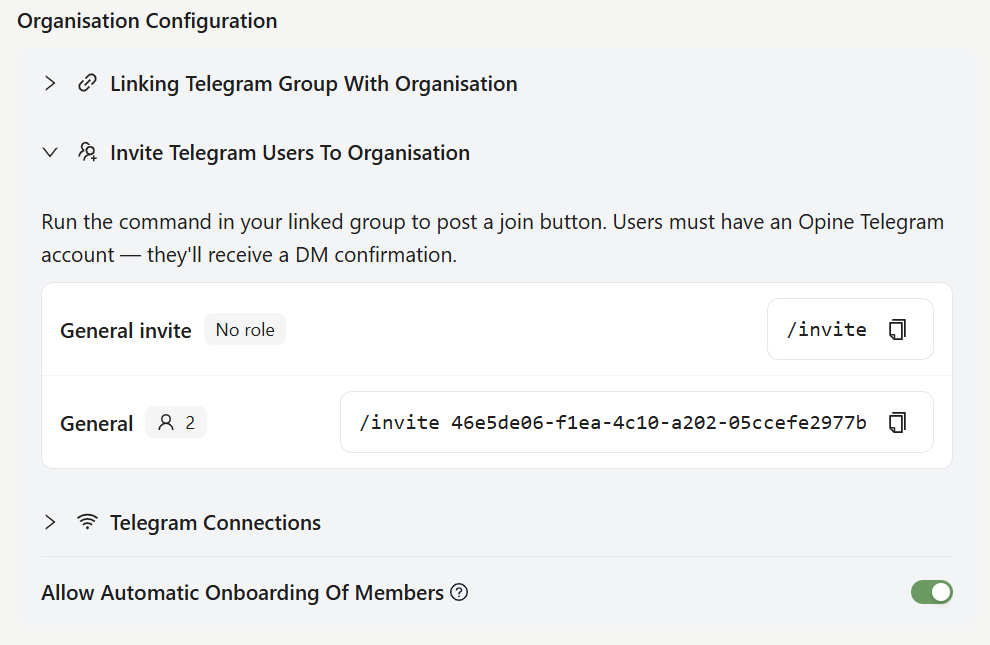
To join as a member via Telegram, users must already have an Opine account linked to their Telegram. You can deactivate the bot per group at any time from Organisation Settings, all buttons and commands stop working in that group.
Member Management
Onboard members, capture custom data, assign roles, and broadcast updates, all from the Members Management tab.
Onboarding your first members
Users can become members three ways: manual email invitation, automatically when they interact with a form or event (if auto-onboarding is on), or via the Telegram bot in a linked group.
Inviting by email
- Open the Members Management tab.
- Choose Add Member (single) or Upload CSV (bulk).
- Users are prompted to join by email or on their next survey attempt.
- If they aren't on Opine yet, they get an invitation email with a dedicated account-creation page.
- Optionally tag them with a member type as you invite.
Reading the member table
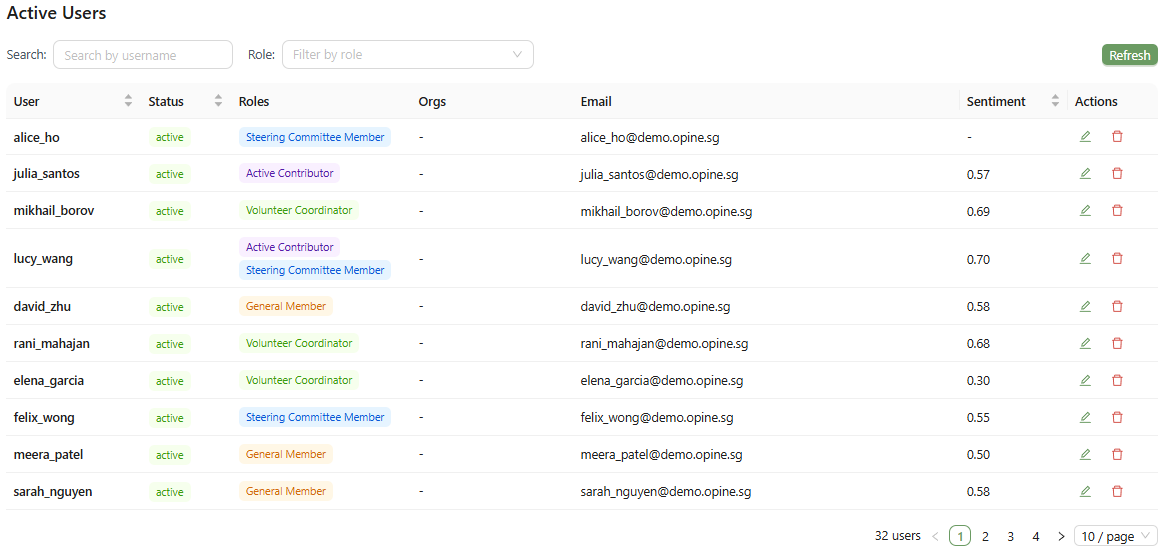
Search by name, filter by role, and invite, single or bulk, from one toolbar. Alongside each member's sentiment sits their engagement group: Champion, Dormant Advocate, At-Risk Regular, or Disengaged. Filter on that column to work one group at a time, and sort by it to bring the members who need attention to the top.
Automatic & paid onboarding
Enable auto onboarding in Organisation Settings to prompt any registered user who starts a form or event to join, on the web, in Telegram, at the bottom of an event page, or from the landing page. For paid onboarding, create a form of type Onboarding and attach it to the landing page or share its link directly.
Onboarding forms don't require an account
Onboarding forms used to force respondents to create an Opine account and join before they could answer, which cost sign-ups at the worst possible moment. They no longer do: anyone with the link can complete one, and every onboarding form carries a required Name and Email question so you always know who replied.
You then decide who becomes a member. Open the form's Responses tab and invite respondents to the community from there, tagging a member type as you go, so joining is something you offer people who already showed interest, rather than a toll gate in front of the form.
Onboarding forms created before this change may not have the fixed name and email questions. Add them in the survey editor, or ask your administrator to run the one-off migration that backfills them.
Capturing custom member data
Add custom data variables from the Members Management tab via Add Optional Member Data. Define a variable and mark it required or optional. When a member starts a survey they're prompted to fill in these values; required ones must be completed before proceeding.
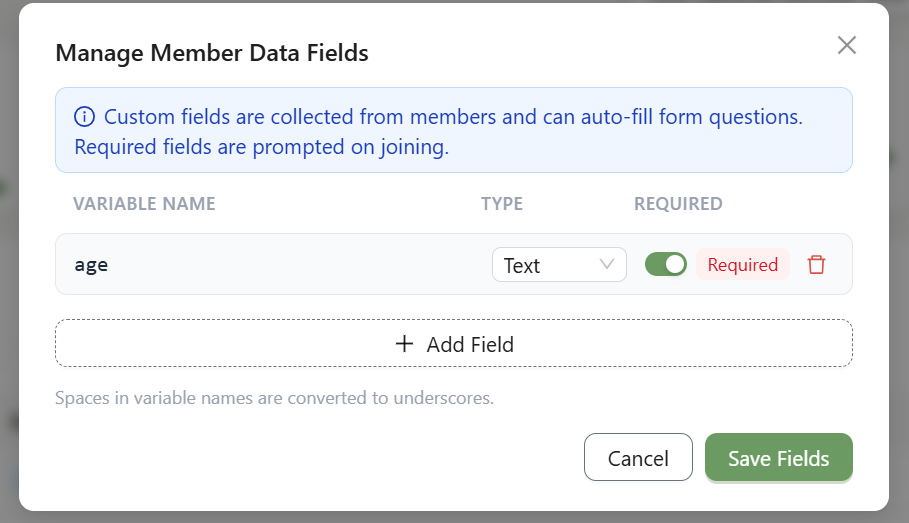
In the survey editor, short-text questions can be configured to pre-fill from these member variables.
Membership types & roles
Create member types (roles) with a name, description, visibility (Hide from Members), and default duration. If a duration is set, each membership gets an expiry date.
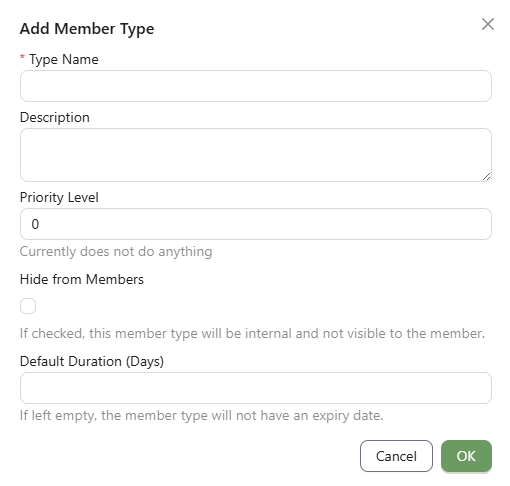
Once a member accepts their invitation, click their row in the members table to tag them with the appropriate tier. All roles are visible on a user's profile unless Hide from Members is on.
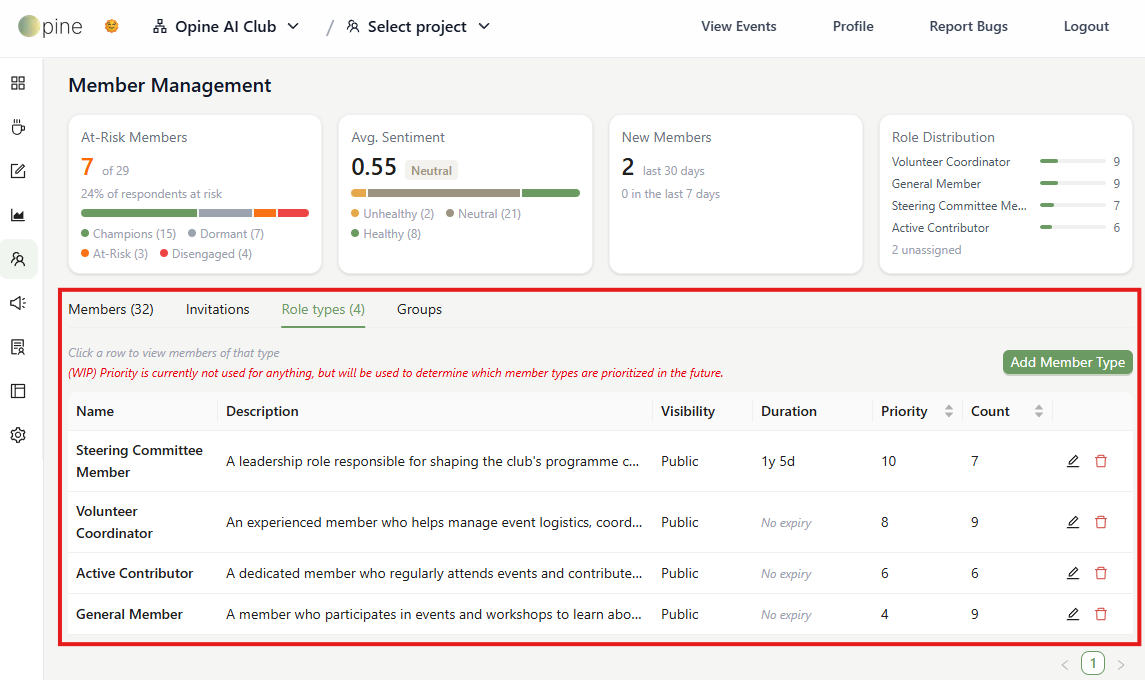
Renewals
Member types with a duration expire, and chasing those expiries by hand doesn't scale. Attach a renewal form to a member type and Opine handles the reminder for you: as a member's role approaches its expiry date, they're emailed a link to that form. Each member is reminded once per cycle, so nobody gets pestered daily.
Submissions land in the Renewals view, where you review what they filled in (the submitted response is one click away) and confirm the renewal, which extends the membership by the type's duration.
Leave the renewal form unset to keep renewals fully manual. Changing a type's duration only affects new members and future renewals, not memberships already issued.
Broadcasting updates
Create broadcast groups under the Broadcast Management tab by selecting members. You can then send custom emails or Telegram messages to specific segments, predefined broadcast groups or micro groups.
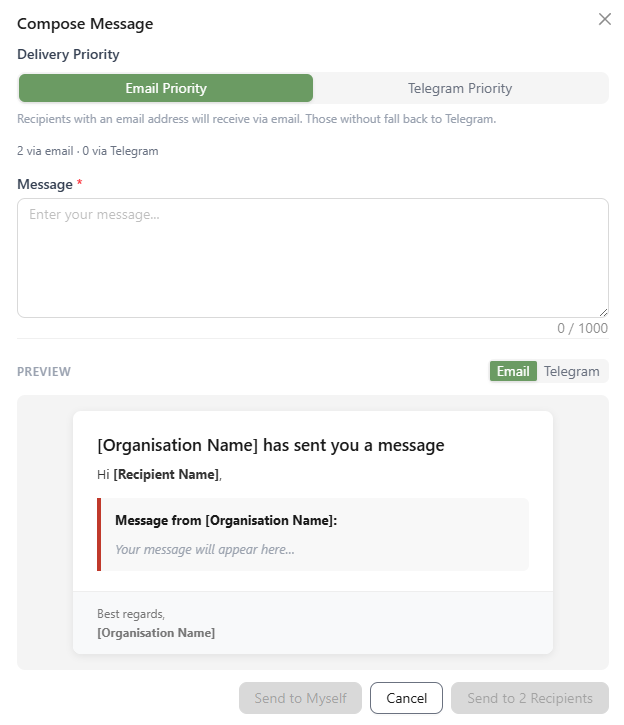
Telegram messages go to the recipient's Opine inbox (not a direct message); they get a daily nudge to check it. Members can also choose to block an organisation's messages.
Did anyone actually read it?
Every email broadcast reports an open rate and a click rate, so "we sent it" and "they saw it" stop being the same claim. The click breakdown is per link: if a message has three calls to action, you can see which one people chose.
The Broadcast History table lists past sends with their open and click rates, searchable and filterable by type, status, and date. Open one for the detail view, a Message tab pairing the content with its preview, and a Recipients tab you can search and filter, showing per person whether they received it, opened it, and clicked.
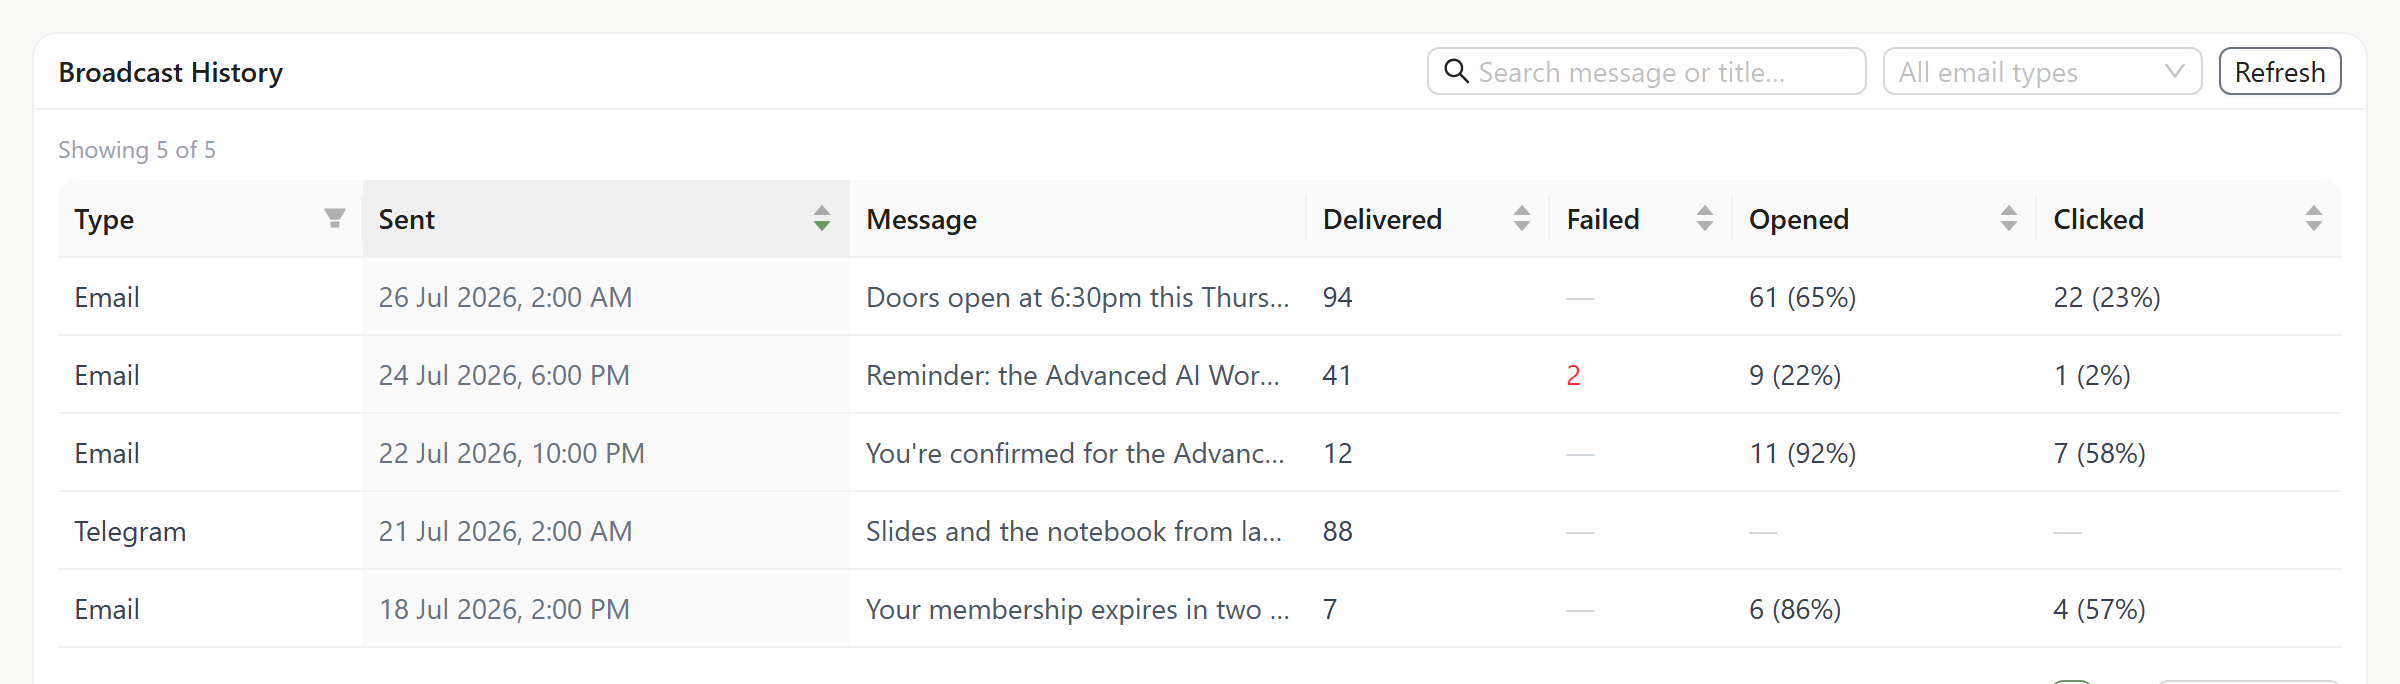
Open tracking works by loading a tiny invisible image, so a recipient whose mail client blocks images can read your message without registering as an open. Treat open rate as a floor, not an exact count. Clicks are counted directly and don't have this caveat.
Rates are reported for email only. Telegram messages show delivery and read state from the Opine inbox instead, since there is nothing to open or click.
Surveys
Build questionnaires and onboarding forms inside a workspace, add collaborators, and get automated analytics on every response.
Creating a survey
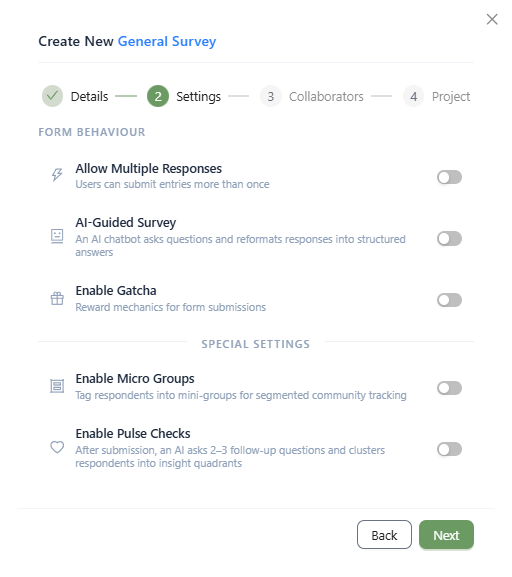
Surveys live inside a workspace, so create an organisation and workspace first. Survey types are General (standard questionnaires) and Onboarding (used to bring new people into the community, see Member Management). The creation wizard lets you configure:
- Allow Multiple Responses: let registered users submit more than once.
- AI Assistance: swap the static form for a conversational AI that interviews the respondent.
- Micro Groups: adds a tab to group respondents (see the final chapter).
- Pulse Checks: adds follow-up questions and segmented cluster analytics (see the final chapter).
Editing questions
Open the Survey Editor to modify questions. Each question supports a description, image attachment, and settings such as min/max length. Conditionals can branch the flow based on Single Choice, Multiple Choice, or Yes/No answers.
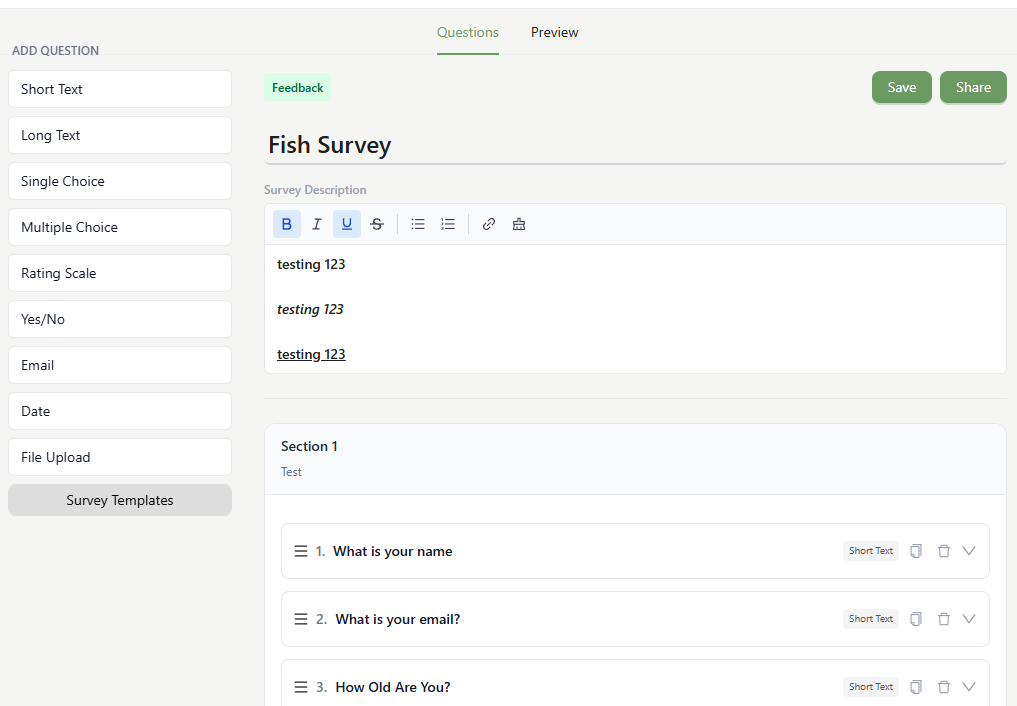
Always click Save after editing questions.
PDPA consent on your forms
Turn on the PDPA Consent extension and write your data-protection notice once, under Community Extensions → PDPA Consent: a question title and the policy text respondents read. Opine ships a sample policy to start from, replace it with your own wording and contact details before you put it in front of anyone. It is a starting point, not legal advice.
Every form you create after that carries a Yes/No consent question at the end, already filled in with your wording and switched off. Open the question in the survey editor and use its switch to ask for consent on that form. Once it's on, a respondent has to answer Yes before they can submit.
- The wording cannot be changed on an individual form; that is the point of setting it once, so everyone agrees to the same thing.
- The question stays last, and moves with you: add a section and it follows to the end of the new one.
- It cannot be deleted, dragged, or duplicated, and deleting the section it sits in keeps it.
- While it's switched off, respondents never see it anywhere: on the web, in Telegram, or in the AI chat.
Editing the wording later only affects forms created afterwards. Forms that already exist keep the wording they were created with, so nobody's recorded consent is quietly rewritten into something they never read.
Forms created before you enabled the extension do not have the question. Enable it first, then create the form.
Settings, sharing & collaborators
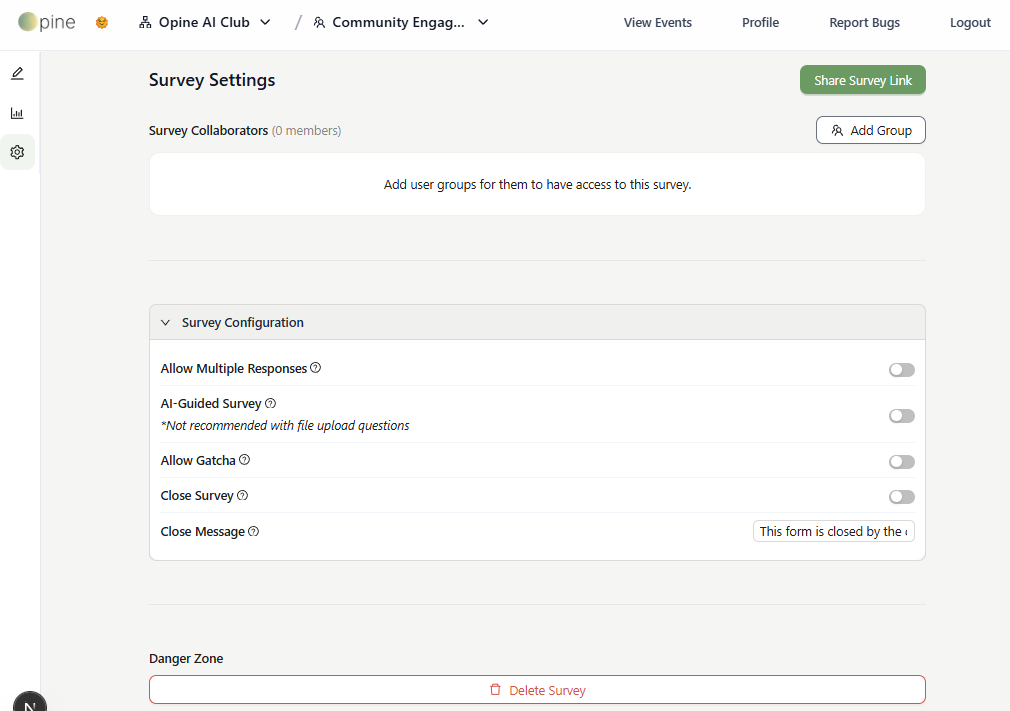
The Survey Settings tab exposes the same behaviour toggles as creation, plus Close Survey and a custom close message. Add collaborators here by selecting an admin group. Share the survey two ways:
- Web Share: opens the web version of the survey.
- Telegram Share: routes respondents to the Telegram bot.
Importing and adding responses
Responses don't have to arrive through the form. If you ran something on paper, in another tool, or over a chat, you can get that data into Opine and have it analysed alongside everything else. Both routes live under the Import button in the responses toolbar.
Import a CSV
- Choose Import CSV and upload the file.
- Map each column to a question. Opine matches obvious headers for you; correct anything it got wrong.
- Optionally point it at an Email and a Name column. Email lets Opine merge a row onto an existing respondent instead of creating a duplicate; Name fills in who the response belongs to.
- Review the preview: it shows exactly which rows will be created, which will be updated, and which columns are being ignored. Then import.
Both the email and name columns are optional. Without an email column every row is imported as a new response, which is what you want for genuinely anonymous data.
Add a single response
Choose Add Response to type one in by hand, useful for a late paper form or a reply someone gave you in person. Turn on keep adding and the form stays open after each save, so a stack of paper forms is one sitting rather than one modal per response.
Survey insights
View analytics under the Responses tab. A submitted response automatically schedules analytics to run 24 hours later, or you can force it with Run Survey Analysis from the Summary tab. Metrics include average sentiment, aggregated ratings, and clustered groupings of open-ended answers.
Each run also writes a short AI Summary to the Summary tab: a few sentences on whether it went well, why, and the single thing most worth improving, with the full text a click away. It's meant to be the thing you read first.
Collaborators are notified automatically when analysis completes, Telegram first (if connected), otherwise email.
Events
Create events inside a workspace with a feedback form attached automatically, manage RSVPs and check-ins, and review post-event analytics.
Creating an event
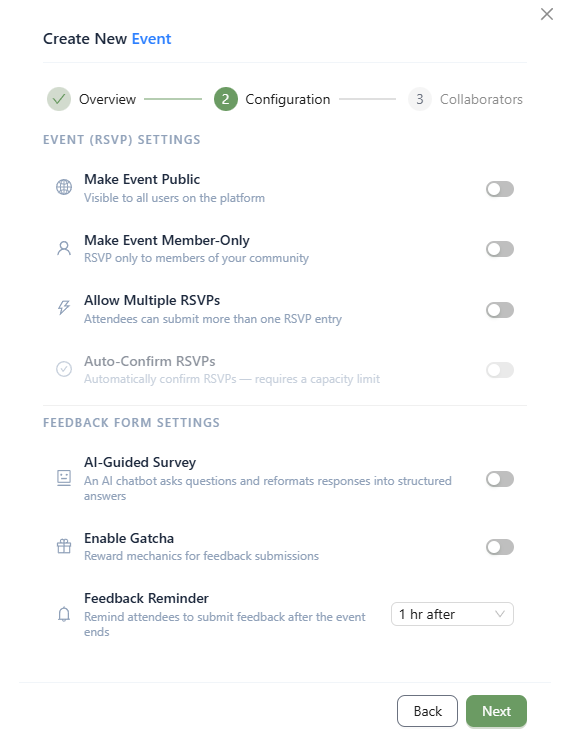
Create events from the Organise Events tab (an organisation and workspace are required first). On creation, a feedback form is generated and attached automatically. The event editor has tabs for Settings, Event Editor, Feedback Editor, Event Management, Broadcast Management, and Responses. The creation wizard covers:
- Make Event Public: visible to all users on the platform.
- Member-Only Event: block non-members from RSVPing.
- Allow Multiple RSVPs: let users RSVP more than once.
- Auto-Confirm RSVPs: pick a member type that bypasses the waitlist.
- AI Assistance: applies to the feedback form.
- Feedback Reminder: auto-remind attendees to submit feedback after the event.
Opine records the timezone you created the event in and uses it everywhere afterwards, RSVP emails state the time with its timezone, and the calendar invite attached to them carries the same, so an attendee's calendar app doesn't shift the event by a few hours.
Event settings & recurring instances
The Event Settings tab tweaks visibility, RSVP rules, auto-confirm, feedback options, and close controls. For recurring events, add specific dates under Event Instances: the walk-in QR can then check people in for different days (e.g. a multi-day workshop). Turn on the instance selector to make respondents pick their date before the feedback survey.
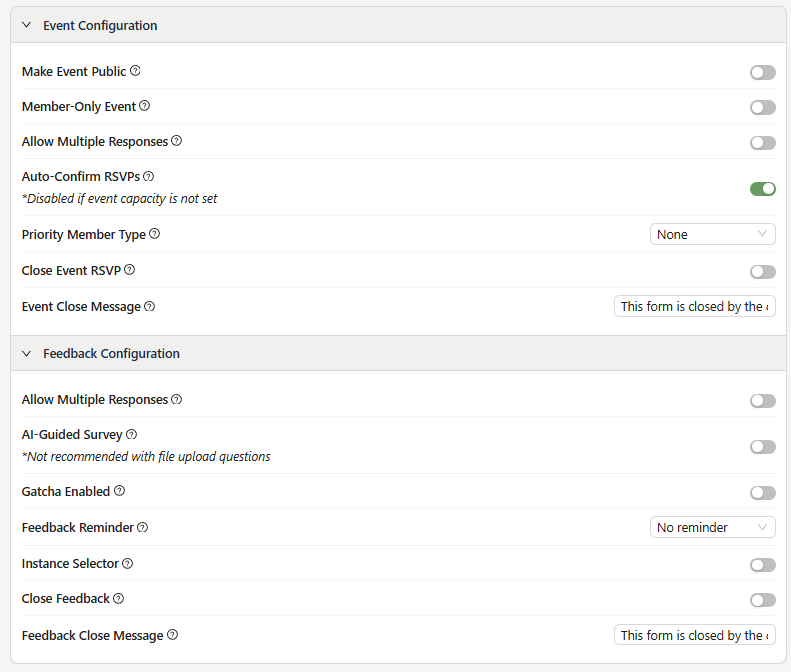
Always click Save after editing. Changes to event dates don't retroactively update past instances; update or delete them manually.
In the Event Hub calendar, an event spanning several days is drawn as one continuous band across those days rather than as a separate block on each, so multi-day workshops read as a single event.
Managing attendees
Handle sign-ups under the Event Management tab. Attendees have one of three statuses: Confirmed, Waitlisted (the default unless auto-confirm is on), or Cancelled. Accept or reject sign-ups manually here.
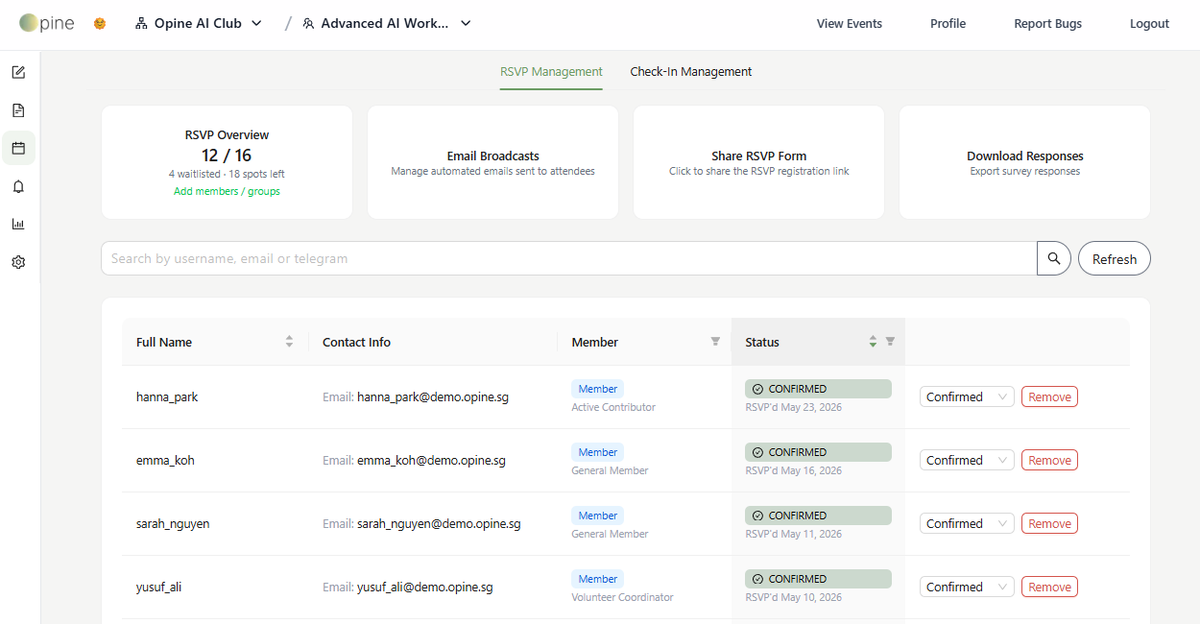
Status changes trigger an automatic notification email. You can customise each status template via the cards at the top of the page and preview them with Test Email. The RSVP table marks anyone who isn't a member of your community as a Guest, so you can see at a glance how much of your turnout is coming from outside.
The Email Broadcasts card carries the engagement figures for everything automated Opine sent these attendees. Open it to see each broadcast type (confirmations, reminders, announcements) with its own open and click rate, so a reminder nobody opens is visible as a reminder problem rather than an attendance mystery. The RSVP table also has an Opened column for the per-attendee view.
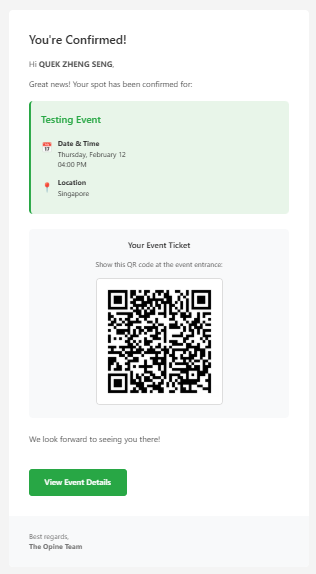
Attach a Telegram group to the Confirmed template to auto-invite attendees to the group once their RSVP is confirmed.
Check-in & attendance
Take attendance two ways, both under the Check-In Management tab:
- Walk-in QR: attendees scan a QR for the selected instance. Unregistered users are auto-registered and checked in; confirmed users are checked in; unconfirmed users see a 'reservation not confirmed' message.
- Manual scanning: on a mobile admin device, tap Scanner QR for the correct instance and scan attendees' ticket QRs.
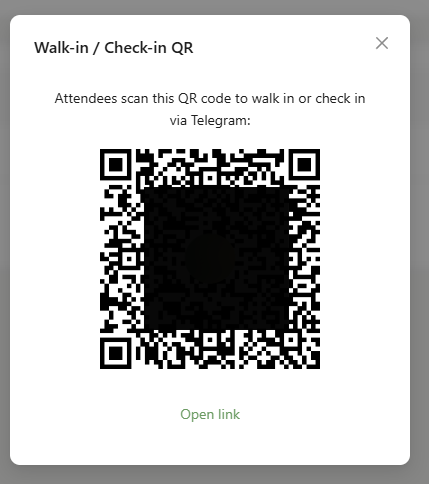
Make sure the correct event instance is selected before scanning, the wrong instance leads to errors. Stats update when the tab is refreshed.
Announcements & feedback reminders
Use Broadcast Management to email or Telegram attendees. Feedback reminders can be sent to attendees of a specific date who checked in but haven't completed the feedback survey, delivered via Telegram where available, otherwise email. A reminder can only be triggered once per event date.
Emailed announcements and reminders report open and click rates the same way broadcasts do, so a reminder that went out but changed nothing is easy to tell apart from one nobody opened. See Broadcasting updates for how the rates are counted and their caveats.
Post-event analytics
The Responses tab offers several views:
- Summary: the statistic cards, the AI summary, automated sentiment analysis with low-sentiment alerts and clickable sentiment cards, and per-question analytics that show metrics rising or falling across instances.
- Responses: the individual rows, with search, filters, and export.
- Response Detail: click a row for the full response, plus comments, micro groups, Telegram invites, and member tagging.
- Trend Analysis: inside the response detail: one person's answers over time (needs multiple responses or instances).
For a recurring event, use the view selector at the top to switch between the combined picture across every instance and a single date.
Add admin-only fields as columns to track things members can't see. Export responses as CSV or XLSX, in Excel, each event instance becomes its own worksheet tab.
Workflows
Workflows automate the repetitive parts of running a community. You define a trigger and the steps that follow it, and Opine moves each person through them one at a time. Workflows is a Community Extension on the Pro plan.
What a workflow is
A workflow is a trigger and an ordered list of steps. People enter through the trigger, and Opine moves each of them along one step at a time: sending an email, inviting them, waiting for them to do something, or pausing for an admin to act. One table shows every person and the step they are on.
Opine already runs a few automations of this shape for you, renewal reminders, event reminders, and the onboarding funnel. Workflows is the general version you build yourself, for the automations those do not cover.
Turn Workflows on under Community Extensions and a Workflows tab appears in the sidebar. Each survey also gets its own Workflows tab, for automations that start when that form is submitted.
A workflow has two tabs. Steps is the canvas where you lay out the trigger and everything after it. People is the table of everyone currently in the workflow and where each of them is.
Building a workflow
The Steps tab is a pan and zoom canvas. Drag empty space to pan, scroll to zoom, or use the zoom controls. Double-click the workflow name in the header to rename it.
Every workflow starts with exactly one trigger. Add steps after it from the add-step menu. A step that branches, a condition or an approval that can be rejected, draws two paths on the canvas.
A workflow stays a Draft until you press Go live. Editing a live workflow is safe: anyone already partway through keeps running on the version they started on, so your edits only reach people who enter afterwards. Pause stops new entries without dropping the people already in it.
Save often. The header shows an Unsaved tag until you do.
Triggers
The trigger decides who enters and when. A workflow has exactly one:
- Form submitted: someone completes a survey or onboarding form. You can require a particular answer. On a survey's own Workflows tab, the trigger is fixed to that form.
- Slot booked: someone books a time on a scheduling page.
- Poll decided: a when2meet poll settles on a time, and everyone who said yes to it enters.
- Membership expiring: a membership type comes within a set number of days of expiry (21 by default), optionally filtered to one type. This starts from a state rather than an action, so the same person re-enters each renewal cycle.
- Manual: you pick the people yourself and start their runs.
The Include existing button on the People tab enrols people who matched the trigger before the workflow went live, such as responses submitted earlier.
Actions, waits, and conditions
Actions
- Send an email: a message with merge fields such as
{{name}},{{first_name}},{{group}}, and{{q:question}}for a form answer. It can carry a one-time invite to a linked Telegram group. - Send a form link and Send a booking link: email the person a correct link to a form or scheduling page, so nobody has to copy a URL by hand.
- Invite to the community: sends a join invitation.
- Assign a membership type.
- Add to a micro group: one or more groups. Spread splits a cohort evenly across them; all puts each person in every one.
- Register for an event.
- Notify admins: messages a chosen set of your admins over email or Telegram, with the other channel as a fallback, can also post to a linked Telegram group, and includes a link straight to that person's run.
Waits
A wait parks the person until something happens. Each one takes an optional deadline and a behaviour for when it passes: nudge (resend the step's email once), skip (move on), abandon (end the run), or escalate (flag it in the table).
- Wait for a form, wait for a booking, wait for membership (they accepted the invite), wait for attendance (they checked in at the event), and wait for group allocation (an admin placed them in a micro group).
- Wait for approval: an admin approves or rejects from the People tab. A rejection can take its own branch.
- Delay: a fixed amount of time.
Condition
A condition checks a fact about the person, a form answer, their group, whether they attended, which slot they booked, and branches on it: skip ahead, take a fork, or leave the workflow.
Some rules are enforced when you save. Inviting has to come before anything that needs membership (assigning a type, adding to a group, registering for an event), or those steps would silently skip non-members. A workflow also cannot send the renewal or event-reminder emails Opine already sends on their own schedule, to avoid double-sending.
The People tab
One row per person: their name and email, the step they are on, how long they have been waiting (flagged once past a deadline), their group, and a row action. Filter chips across the top show each state with its count.
- Rows waiting on approval show Approve and Reject inline.
- Select several rows in the same state to act on them together, for example opening the Micro Group Formation table pre-filtered to everyone awaiting allocation.
- Open a row for the run drawer, the full history of that person's run. The URL updates, so you can share a link straight to it.
Custom statuses
Under Manage statuses you can add your own statuses (for example Needs a call or Waiting on payment) alongside the automatic ones. Per status, Opine can notify chosen admins whenever someone is assigned it. When you change a person's status you can attach a note; it travels in that notification and lands on the person's comment thread.
Example workflows
A few shapes organisers build:
- Onboarding to a briefing. Form submitted, wait for your approval, invite to the community, wait for membership, welcome email, add to a group based on an answer, email them their group with
{{group}}, send a booking link for a briefing slot, then register whoever picked the Tuesday slot for the Tuesday event. - Feedback from people who came. Someone RSVPs; after the event, wait for attendance; branch on whether they checked in; send the feedback form and one chase to those who came, and a short 'sorry we missed you' to those who did not.
- Renewal chase. A membership type is three weeks from expiry; send the renewal form; chase once; an admin approves the response; the type is re-assigned.
- Thirty-day new-member journey. Invite, wait for membership, welcome email, delay a week, tips email, delay a fortnight, register for the next social.
Pulse Checks & Micro Groups
Two advanced survey features that cluster members by sentiment and group them for closer engagement. Both are enabled in survey settings and only available on General surveys.
Pulse Checks
Enable Pulse Checks in survey settings to add a Pulse Checks tab under Responses. It analyses responses against member-level data across four quadrants:
- Champions: high attendance, high sentiment.
- Dormant Advocates: low attendance, high sentiment.
- At-Risk Regulars: high attendance, low sentiment.
- Disengaged: low attendance, low sentiment.
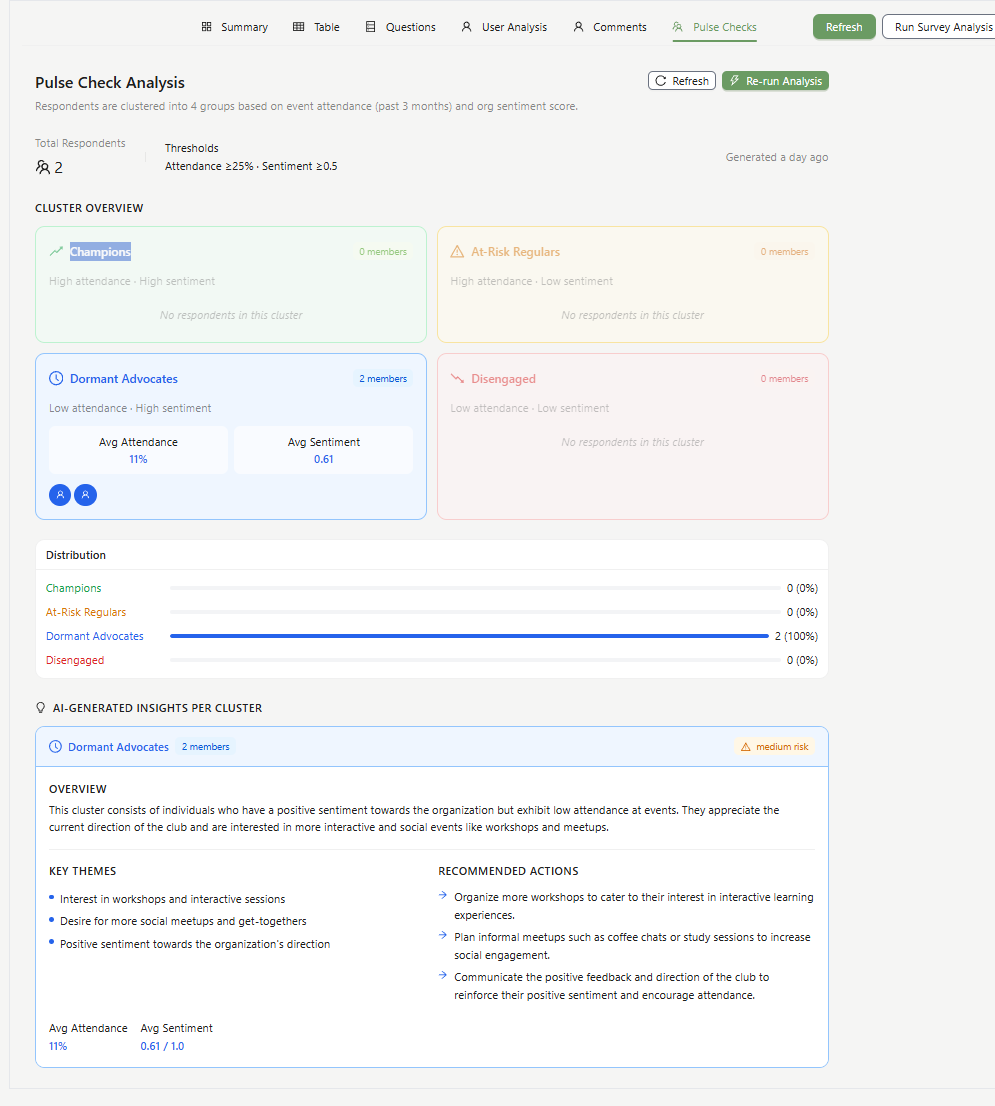
Only available on General surveys, and only for people who are registered members of your community, others are blocked from the survey.
Micro Groups
Enable Micro Groups in survey settings to add a Micro Groups tab under Responses. Group members manually or automatically with AI, choosing mentors as anchors per group. Preview generated groups, confirm them, shift members between groups, and export the result to Excel.
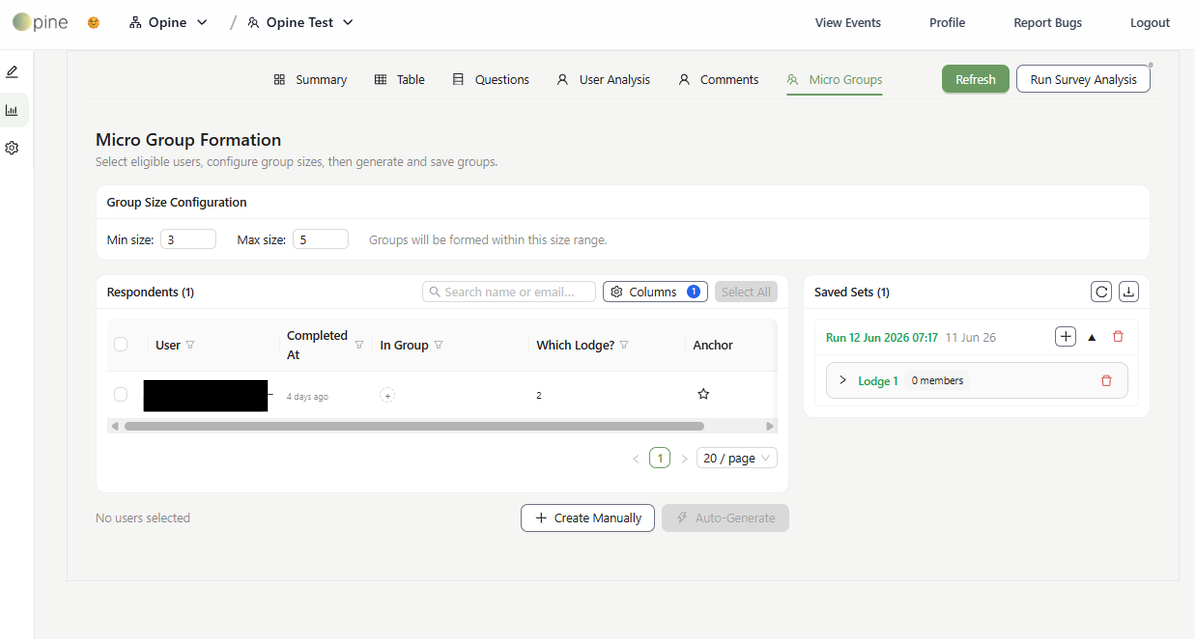
Choosing what the respondents table shows
Use the Columns button beside the search box to decide what you group people on, without leaving the table:
- Any survey question as its own column, so answers sit next to each other rather than one response detail at a time.
- Comments: the notes already recorded against that person, each attributed to whoever wrote it, with a + to add one without opening their profile.
- Member Types: the roles they currently hold, filterable by type when you want one group per tier.
- Completed At and Anchor can be switched off when you don't need them.
Your choice is remembered per survey, and columns can be dragged wider. Comments and Member Types need organisation Owner or Admin access, a collaborator who only has the survey sees them empty.
Only available on General surveys, for registered community members. Micro groups can also be assigned from the response detail popup or the Members Management tab.
Still stuck? Reach us at support@opine.asia.